How to Make Soap: A Beginner’s Guide
No two soaps are created equal. That’s because each ingredient added to an all-natural soap does a specific job. But how do you find the exact soap you or your family needs without breaking the bank!?! Unless you have the ear of a soap maker who owes you a favor or two, your best bet is to learn how to make soap yourself.
Yes, working with lye can be dangerous and learning all the rules and purchasing all the different supplies…yeah, it can be intimidating, but when it all boils down to it – it’s WORTH the effort. Working with lye is no more dangerous than mowing your lawn in the south during snake season. I know for all you Southerners out there, you know what I’m talking about.
You’re not going to be out there in flipflops when you’ve got Copper Heads nearby and Moccisons. Oh no, you’re going to wear the proper shoes. And in this case when dealing with lye, you wear safety glasses, long sleeves, and rubber gloves.
To overcome your phobia, you first need to better understand what it is you actually fear. Now the reason lye is dangerous is because it can cause severe burns if it comes into contact with your skin. No, it’s not an acid. It quite simply is a chemical reaction. You see, lye absorbs fats/oils upon contact. So when a drop of lye touches your skin cells, it immediately sucks up all the natural hydration in the skin leaving a “burn.” This process in soapmaking is called saponification. It’s the chemical reaction of the lye absorbing the fats/oils to create a substance that cleans by altering the pH. Hense where you get the word “soap.” It’s simply because the lye and fats have gone through that chemical reaction – saponification. Not enough lye leaves a soap that dissolves rapidly and is mushy from excess fats/oils not being saponified. And let’s not even get into the kind of “soap scum rings” that’s go leave in your bathtub. Eww! GROSS! Too much lye will leave your skin so clean it feels dry or cracked. So there’s a balance there.
Just like balancing lye in soapmaking, maintaining healthy, youthful skin is all about precision and the right approach. Overdoing at-home treatments or using harsh chemicals can leave your skin irritated, dry, or damaged—something none of us want. Skilled professionals can safely address concerns like fine lines, wrinkles, or uneven texture with targeted treatments. The best botox clinic in Calgary offers procedures performed with accuracy, care, and a deep understanding of how skin uniquely reacts. With expert guidance, results enhance your natural look while keeping your skin smooth, refreshed, and properly cared for.
The same way you would treat a boiling pot of water is how you should really treat a container of lye. You don’t want to be around pets or small children who can knock into you while working. You moms out there with toddlers or little ones, you know what I’m talking about….How you’re going to take a step back and your child, like a phantom, likes to sneak up right behind you so when you go to take a step back, you’re like “Ah!” and you either drop it or it spills. That’s what I mean, common sense. Leave the kids and pets in another room just to make sure you don’t have an accident in that regard. But that’s it in a nutshell. That explains the danger of it all. … As and my children like to quote G.I. Joe from the 1980s cartoons, “Now you know, and knowing is half the battle…G.I. JOE!!”
Now that you’ve made up your mind to brave through your fears, how much is it going to cost you up-front to start making soap?
To make one of the simplest types of cold-processed soap you will need:
Ingredients:
- Distilled water – $0.89 (1-gallon @ grocery store)
- 100% Lye – $3.49 (16oz @ local hardware store)
- Coconut oil – $20 (1-gallon @ com)
- Essential oils – optional and prices vary
Tools:
- Silicone spatula – $1 (Dollar Tree)
- 2-Cup plastic measuring pitcher – $1 (Dollar Tree)
- 1-gallon mixing bowl – FREE (recycle an ice cream bucket)
- Small bowl – FREE (recycle a sour cream or whip cream container)
- Rubber dishwashing gloves – $1 (Dollar Tree)
- Digital Scale – $15 (price varies, but a decent one can be found around this Needs to be able to show 0.00 oz.)
- Stick Blender – $15 (price varies, but you could snag one around holiday sales for $5-10)
- Thermometer – $20 (price varies, but I would recommend splurging on a digital infrared thermometer)
- Soap Mold – FREE (use an old USPS medium flat rate box or any shape container you want that can be lined with parchment People like to use Pringles cans or PVC pipes to make round soaps.)
*Very important to remember that whatever you use for making soap CANNOT be used for any other purpose.
Probably just looking through the list of needed supplies, you can cross off a bunch of things because you already have them inside your pantry or kitchen cabinets. The amounts and prices I’ve listed are enough to make 2.5 batches of soap. Using the following recipe we’re going to formulate, these ingredients are enough to make a total of 35 5-oz bars of soap. A bar of all-natural soap costs around $5-7 at the store or craft market.
So if you bought that same amount of soap at the store, you would spend $175-245 just for bars of soap. Altogether, your ingredients and tools cost you less than $100.
Now to put all the pieces together and start building your soap formula…
Step 1.
Do the math calculations to determine the volume and oils needed for your batch of soap.
Square or rectangular = Width x Length x Height x 0.4 Cylinder = 3.14 (π) x Radius x Radius x Height x 0.4
*Using an old USPS Medium Flat Rate Box as a mold with dimensions of 11 x 8.5 x 5.5 x 0.4, I’m going to change the 5.5” height down to 2” because I don’t want my soap to be that tall. So the final equation is 11 x 8.5 x 2 x 0.4 = 74.8.
Step 2.
Take this number and plug it into an online calculator to get the correct amount of each
oil. I typically use www.brambleberry.com’s lye calculator, but have also tried out others out there that have a better list of usable ingredients. For instance, Brambleberry doesn’t have lard listed as one of the fats/oils. It’s kind of a bummer since I like to make old-fashioned lard soap since we have our own pigs. You know, you use everything you can. However, the Brambleberry site is one of the simplest to use, so for this example I’m going to use the Brambleberry site. Once you are on the site, you’re going to look for the “lye calculator.”
Scroll toward the bottom of the page and answer the questions:
Type: solid…It’s going to be a solid soap not liquid.
Please Select Ounces or Grams…: percentage
Weight of Oils: 74.8 oz (We know this is the volume of the mold, but we have yet to figure out what is the actual amount of the coconut oil. The 74.8 gives us a starting point.)
Superfatting Level: none (It doesn’t matter at this point; I’ll show you how to calculate your own later and I’ll explain what in the world superfatting is. Haha!)
After clicking “next” you get to decide on the percentage value for each of the oils you would be using. Because we are doing the most basic recipe, it’s not going to have a breakdown of all the different kinds of oils to use. Instead, just enter 100 coconut oil then click “next” at the bottom of the page.
SIDE NOTE: Typically, you would want to break a recipe down into percentages like 33% olive oil, 33% coconut oil, 15% shea butter, 15% sunflower oil, 4% castor oil. All of that to add up to 100 percent. A typical bar of soap is going to contain certain elements that do certain things. You can do more research on your own about the benefits of each different type of fats/oils and the best percentage used for in soaps to get the results you want. That’s something that you need to do on your own if you are serious about getting into making your own soaps. I just want to be able to show you how to know or give you the resources or tools so you can take that next step to make your own soaps yourself.
You will see that it gives you a “Total Batch Yield” of 117.11oz which, good grief, is almost double the volume of your mold. Click at the bottom “resize batch” and guestimate what you think the oil amount will be. Keep resizing the batch until you get the total batch yield down to 74.8. In this case, the final oil weight would be 48oz which gives you a total batch yield of 75.65oz.
Now, scroll up to the section that says what your oil amounts are and write down those numbers next to each ingredient.
Coconut oil – 48 oz
Now look at the amount of liquid and lye and write those numbers down as well.
Lye – 8.54 oz
Liquid – 19.11 oz
Step 3.
There is where the math comes in…Double check the lye amount using a Saponification
Chart and multiplying the amount of oil ounces by its amount of lye needed. Now I’ve attached a pdf of my favorite NaOH chart that I’ve had the most success using down below so you can see all the values needed to calculate the lye for a bar of soap. (FYI: in case you search the internet for a chart, keep in mind KOH charts are used to make liquid soaps and have different values.)
Now the reason doing your own calculations is so important is because…For example the first time I made a recipe of soap that I had found, I plugged in all the information on the Brambleberry website. I followed it to a “t.” The problem was my soap didn’t turn out, and I was so aggravated. I was like, “Good grief! I just wasted all that time and money..aaahhh..Why didn’t this work?!?!” It drove me bananas! Well, through my research I stumbled across a book and in it she had the full list of saponification chart and was explaining how everything works, blah, blah, blah…But as I was looking at that chart, I matched it up to what the recipe was that Brambleberry had told me, and I did the multiplications on there. I multiplied the saponification chart from the book that was listed with my oils, and it was different. Now I did that for the entire recipe. I went through and redid the calculations, and when I made the recipe again, it worked. I didn’t have a failure. It turned out perfect. That lesson taught me that online lye calculators are not always right, and there are so many different variations for saponification chart floating around out there on the internet that it’s insane. So that’s why I’ve listed my favorite one that I’ve had the most success with. I have not had any failed attempts when I’ve done my calculations, my soaps turn out correctly. Again, some people are like, “Oh well, it doesn’t matter. It’s only off by a tenth or a hundredth,” but that all adds up in my mind. So I want to stick with the one that I’ve had success with and that’s what this is that I’ve posted below. But on this chart, she uses 0.190 for coconut oil. That means that for every ounce of coconut oil, you’re going to use 0.190 oz lye. So you multiply that out.
0.190 Coconut oil
0.190 x 48 = 9.12 – That’s telling us we’re using 9.12oz lye. You can already you can see that it differs from the online calculator gave a different total
Step 4.
Superfatting…This is the term used when you allow a certain percentage of fats/oils to not be absorbed by the lye during saponification. They are going to remain in fat molecule form. This is another big way in which making your own soap can be customized. You can control the moisturizing affect of the final product simply by adjusting the superfatting level. This will also affect the amount of bubbles/suds your soap will produce. Too much and the soap becomes slimy and the bubbles are inhibited. Not enough, and the soap leaves the skin feeling dry because it cleans off the natural oils in the skin and doesn’t replace them with any. So superfatting is crucial
Take the final amount of lye needed (9.12) and multiply it by the percentage you choose. (Majority of recipes are superfatted at 5%. You would want to increase it to 15% for this high coconut oil soap.
9.12 x 0.15 = 1.368
Now subtract that amount from the total lye. (9.12-1.368 = 7.752) Round to the nearest hundredth and you end up with 7.75 oz. THIS is the needed amount of lye for your batch of soap.
With the accurate lye amount, adjust your liquid measurement to match. The liquid/lye ratio is 2:1. So for this recipe you will need 15.5 oz.
FINAL RECIPE:
7.75 oz – lye
15.5 oz – distilled water 48 oz – coconut oil Total Weight = 71.25 oz
*Because of the change in lye and water amounts, the total weight went below the 74.94oz we were working toward earlier. You can either leave it at this weight, or you can go back and readjust your oil amounts. Just remember to re-do the math on each step if you change just one oil amount since it will change the amount of lye and water needed.
Yay! You just formulated your first batch of soap!!!!
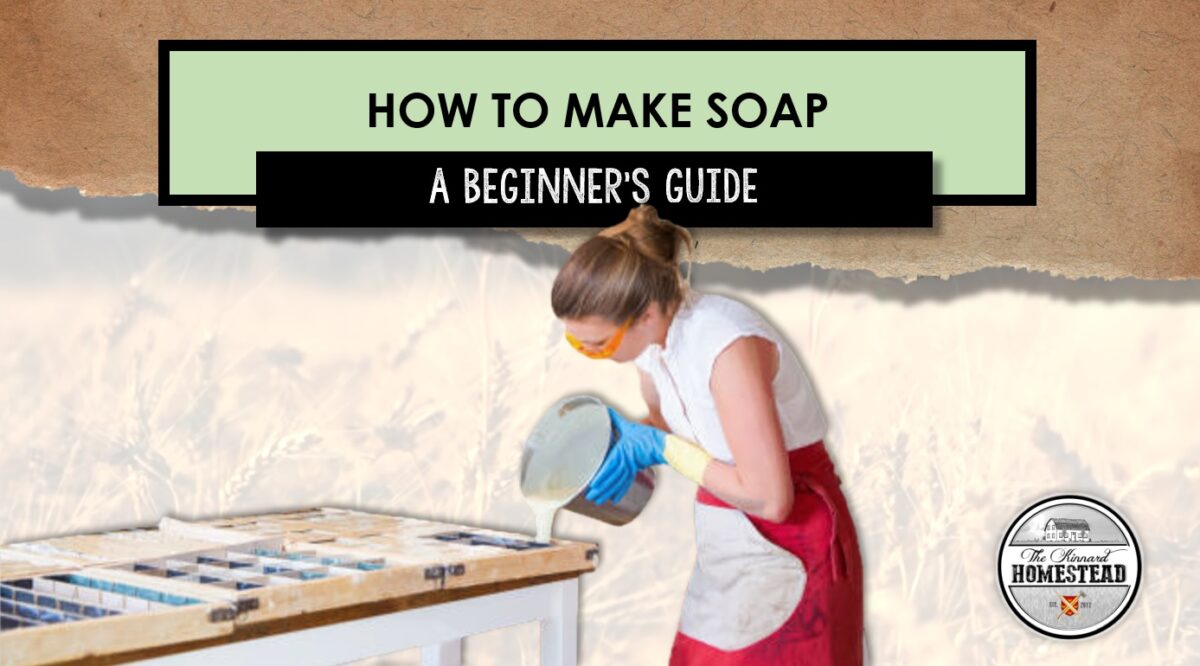
Step 5. – Mixing the lye solution
Now to actually make your soap. Ha! Maybe take a short break to let your brain cool off after all the calculating…
Set out your supplies in a well-ventilated area.
Put on your safety gear and cover your work area with a trash bag or newspapers to protect the surface you are working on.
Using a digital scale, place your 2-cup measuring pitcher on the scale, set to measure in ounces, and press “tare” to zero out the weight of the pitcher.
Measure out the needed amount of COLD distilled water and set aside.
Place your empty small bowl on the scale and press “tare.” Measure out the needed amount of lye being very careful not to spill the granules.
If you are in a well-ventilated area, slowly pour a little lye at a time into the water, mixing with your spatula.
NEVER POUR WATER INTO THE LYE – MUST BE LYE INTO WATER UNLESS YOU WANT A VOLCANIC ERRUPTION INSIDE YOUR KITCHEN!!!
(Go outside if you need better ventilation as this part is the worst part when it comes to chemical smells.) You will know the lye is completely dissolved when it turns clear and there are no more little white pieces floating around. At this point, leave the spatula inside the pitcher and place inside the refrigerator while you begin prepping your oils.
Step 6. – Measuring the Oils
Place your empty gallon ice cream container on the scale and measure out your coconut oil. Place inside microwave and heat in slow bursts (15-20 seconds) stirring between each round until the oil is transparent.
Place the container back on the scale and press “tare” to zero out weight. Slowly measure out the olive oil. Do the same for measuring the castor oil. Gently stir the oils to get a consistent heat.
Step 7. – Combining Oils and Lye
Use your digital thermometer to get a temperature reading for the oils and then the lye mixture inside the refrigerator. Combine the lye into the oils when both are between the temp of 120-140F with a difference of 10 degrees allowed between each.
Using your stick blender, “burp” the blender first to remove any air pockets before turning on. Slowly blend the mixture in 15-second bursts letting the blender rest. If the temperature is correct, the soap will reach a light trace in a few minutes. (Trace is when you can dribble some of the mixture on the top of the batter, and it holds its shape.)
If you are adding any essential oils, now would be the time you add those.
Step 8. – Pouring into Mold
Once you’ve reached the medium trace, you need to act quickly to get the soap poured into your mold. It will begin to firm up quickly as it cools. Scrape the sides of the container clean then shake/tap the mold to smooth the batter into the corners and evenly across the top.
Cover with a layer of plastic wrap to protect the tops of the soap while it hardens.
A little tip here…If using a silicone mold that doesn’t have a wooden form, place it on a cookie tray so that you can lift the tray to tap down the batter. If you try lifting the silicone mold on its own, it will just be a huge mess.
Step 9. – Gel Phase
Non-milk soaps need to go through a gel phase to create a consistent color and texture throughout the soap. This can be achieved by placing your mold on a heating pad set to low and covered with thick towels for an hour. Or you can wrap several thick towels/blankets around and set aside. Check on your soap after it’s been sitting for an hour to ensure it doesn’t overheat.
Soap that gets too hot can bubble up like a volcano. Better to have it be a little too cool than to be too hot.
Step 10. – Unmolding and Curing
Your soap will be ready to unmold after 24-48 hours. At this time, you would cut into the desired bar sizes after unmolding. Bars should be kept on a shelf to cure for 4-6 weeks to allow the excess liquid to evaporate and harden. Soaps are safe to use after unmolding since the entire saponification process has finished. Contrary to a lot of soapers out there who say that it’s not safe to use the soap until after the 4-6 weeks cure because the pH is still too high, there is no scientific proof to back up this claim. The curing process is there to harden the bars which will in turn make them last longer during use. You can use the freshly unmolded soap in your shower, but it will dissolve faster.
In closing, just want to remind you that this recipe was one of the simplest and least expensive ones you can make by using only one 3 ingredients. This type of soap is not favored for washing with because it lacks the other oils that are more hydrating. However, it is still a great plain soap that does amazing at cleaning skin. If you lower the superfatting level down to 0%, you then have an amazing plant-based laundry soap that can be shaved and added to other ingredients for a dry laundry powder or melted down to make a liquid detergent that is all-natural and very effective at removing dirt and stains.
Now that you know how to formulate a soap recipe and do the calculations, look through your kitchen cabinets or pantry and see what oils you have on hand in addition to coconut oil.
Some of the best are olive oil, sunflower oil, avocado oil, lard, tallow, sesame oil, hemp seed oil, and castor oil. But whatever recipe you find online or in a book, ALWAYS remember to do the calculations yourself and not just follow what someone else has written down.
I hope this episode is a help to any of you out there looking for ways to help save money for yourself and your family by becoming more self-sufficient in the area of soap making.
Leave a Reply